|
Axialflow
Mazda RX-8 Short Shifter DIY
1.) First, undo the shift knob. It's a standard right hand
thread. Undo by twisting counter-clockwise. If you have an
illuminated shift knob, take extreme care not to damage the
wiring, you may wish to release the shifter cover to check on
the wiring layout underneath first.
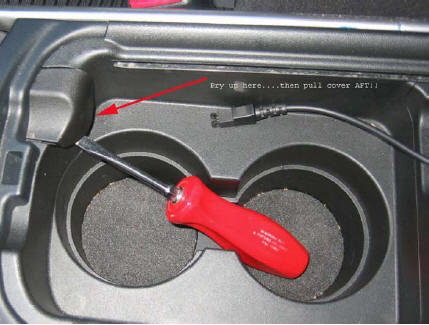
2.) You must now
remove the shifter cover. You have to gain access to the rear
right hand tab of the shifter cover. Remove the small panel
located forward of the cup-holders (see picture).
Hymee Tip:
for those with long fingers, if you release the handbrake, you
can push this handbrake adjust access panel aft by reaching
through the gap at the back of the handle and lifting the tang
from inside.
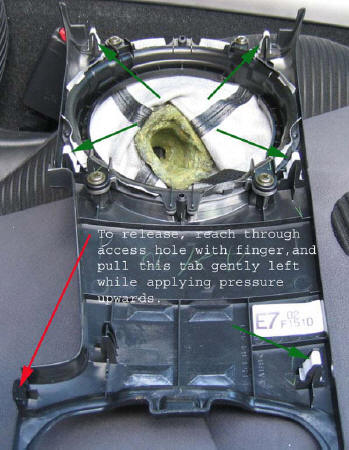
3.) Now having
removed the small handbrake adjust access panel, you can get to
the rear right hand tab securing the shifter cover. You need to
reach in and use your finger to release the tab from the console
base. Take care, this one tab is very fragile!
4.) With the rear
right hand tab released, you can now gently pry up on the rear
left hand corner of the shifter cover and unclip it there. There
are four remaining tabs centered around the shift boot, you can
pull up on the shift boot to unclip them. If you have Audio
pilot, Satellite Navigation and/or seat warmer switches, you'll
need to undo these connectors now.

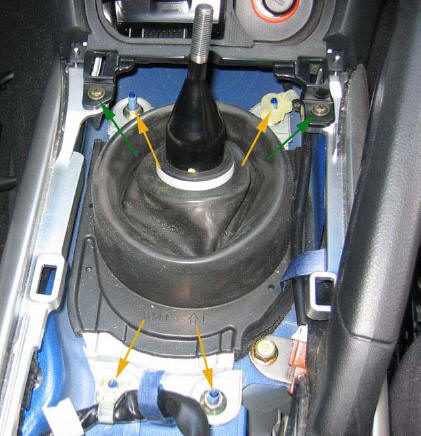
5.) With the cover
removed you now need to remove the upper rubber shift boot.
There is another rubber boot under it. I found it easier to
remove the ashtray to gain access to the two forward 10mm shift
boot nuts, the ashtray is secured with the two screws indicated
by the green arrows in the picture below.
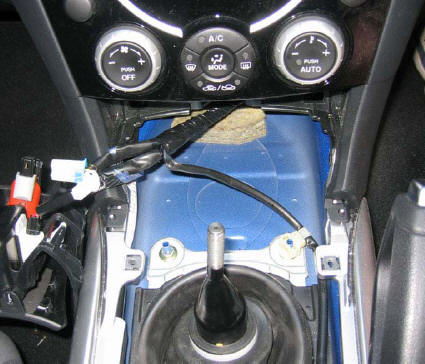
6.) You can hang
the ashtray off to one side as I have here. This will also give
access to the illuminated gear knob connector (so they tell
me!).
7.) Now you need
to undo the four nuts indicated by the orange arrows. Two of the
four nuts have wiring harness clips over the threads. These are
a pain to get off. I used a small flat bladed screwdriver to
separate the clip from the thread....others have had success
using a straightened paperclip bent into a "U" shape.
8.) With the four
10mm nuts removed, the upper rubber shift boot can now be
removed. Gently twist and pry off by hand. Now you can see the
lower shift boot, it is held on by love....remove by hand.

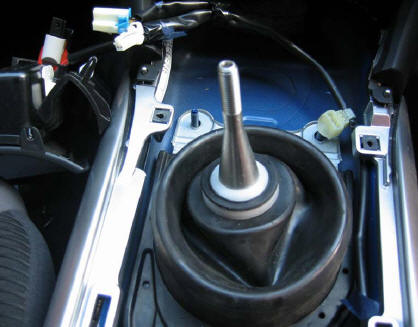
9.) To remove the
stock shifter, undo the three bolts securing the plate seen here
and then lift the shifter out of the housing. The bottom part of
the shifter locates into the gearbox itself, take care not to
drip gearbox oil on the seats when you remove the shifter.
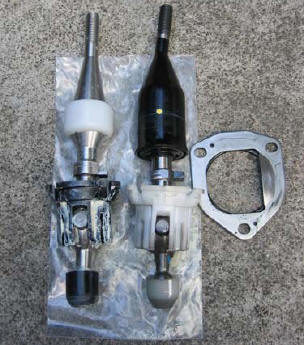
10.) The two
shifters side by side....Axialflow
on the left. Note the white ring half way up, this seals the
upper boot to the shifter as you'll see in later pictures. Also
note the reverse lockout tang which is pointing out on the
right, without this there'd be nothing to stop you accidentally
selecting reverse without pushing down on the shifter......
11.) The shifter
is supplied pre-greased. Just slip it straight in taking care to
locate the reverse lockout tang to the right. Bolt the retainer
plate back on and refit the gear knob. Check you can select all
gears. Marvel at the difference.
12.) Remove the
gear knob, and refit the lower and upper shift boots. The upper
shift boot is secured on the white ring as in the image below...
13.) The rest is
just a reversal of the disassembly. Secure the upper boot, refit
the harness clips, connect up your illuminated shift knob (if
you had one!) and replace the ashtray. Reconnect your seat
warmer/ Audio pilot connectors, replace the covers and
knob......you're done.
Special thanks to
http://www.enginepsd.com/ for visual DIY instructions.
|